Fiber Classics 35% Extra 330L
by Zak West

Model Name: Fiber Classics Extra 330L
Scale: 35%
Wingspan: 104"
Length: 92"
Weight: 24.5 lbs.
Wing Area: 1875 sq in.
Wing Loading: 30 oz/sq ft.
Engine Used: 3W TOC 100cc
Prop Used: Mejzlik 28x10, MSC 27x10
Fuel Used: 87 Octane Unleaded Gasoline
Radio Used: Futaba 9ZWCII
Servos Used: (9) JR 8411
Assembly
I will try to provide as much information about the
way the plane is built as I can, but I did not build it myself.
I have put a lot of work into it repairing it (the engine flamed in
a hover).
We’ll start up front. The engine is very simple to mount. The firewall already has points marked on it for drilling the holes for your engine. The cowl is a conventional mount, but mine is built with a cowl ring. What was done is that a plywood ring is made to fit inside the cowl, and conform to the firewall. There are then 5 screws that go from the inside of the fuselage into the cowl ring to hold the cowl on. This is a very slick way of doing things, but takes a lot of time to get it right. The ignition module is mounted on a 90-degree wood plate that is held onto the back of the firewall by means of the engine bolts.
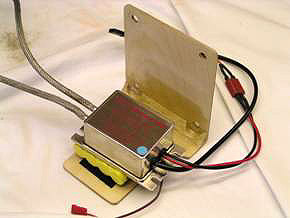
A wood bar was then run across the inside of the fuse to hold the front of the tank mount. The tank mount is also attached to the spar box at the back.

Velcro on the bottom of it holds on the tank, and Velcro straps over the top. I also moved the ignition battery to under the gas tank. It is held on by the same means as the tank. The throttle servo is mounted to the front of the spar box, and uses a flexible pushrod to operate the throttle.

The servo tray holds all 3 rudder servos, the flight batteries, the receiver, and the matchbox for the rudder. It is a solid piece of 1/8 in plywood. I will be lightening it one of these days. It is nicely done by making a frame to support it, and then having 6 screws hold it down. The rudder servos are linked with titanium links and then all are linked to a Nelson bell crank. The bell crank then runs the pull pull cables to the rudder.

The stabs are easy to deal with as well.
They are just thick enough to slide a servo into them.
The servo drops in the end, and then you install the servo arm, and
it’s done. Just link up the
control rods.
The wings have plates that hold the servos in.
These are very nicely built, and easy to work with.
Drop the servo onto the plate, screw it down, bolt the plate in,
and its done, just hook up the control rods.
The landing gear is also easy to install.
They slide in the side of the fuse, and then are held in with 2
bolts on each gear leg.
Building the canopy is a little tricky. The frame is put on the fuse, and then the plywood blocks that receive the bolts are mounted, then the canopy is installed from the bottom, and fiber glassed into place.
Flight Performance Review
We’ll start with the IMAC. I have the balance set up so that it just slightly dives when inverted. The plane is set up this way when I run the Mejzlik 28x10. To move the CG for 3D, I run an MSC (wood prop) and leave the spinner off.
The plane snaps real nice when the rates are set up properly. I have the rates set to the point where the sticks need to be buried to get it to snap. This may seem like it wouldn’t work well when it is at a low speed situation. Thing is in IMAC, you don’t want to be at such a low speed that the plane wont snap.
Spins require all the controls in the corners. It exits a spin very nicely, and with a little practice, you wont even have to let off early to get the spin to stop on the correct point (a tip for spins is to let off the controls about one quarter of a turn early, and then roll to the correct point).
Stall turns are different than with most planes.
I start to add in the rudder before the plane gets to the stall
point. Once the plane gets to
be stalled at the top of the stall turn, I give it all the rudder I have
in it, and a blast of power to make sure it gets over the top.
Some elevator and aileron is needed at times to keep it strait.
It flies 3D Extremely well. Things such as rolling harrier, torque rolls, and flat spins are very easy to do. Harriers are also very easy, and are very stable. One thing about the harrier though, is that they are not very nose high. You can get the nose up easy enough though with a bit of power. One thing that I found nice about this plane, is that the knife edge is very stable. It does couple a bit, but it takes very little input to keep it strait. Rolling harriers are smooth, and the nose is kept high, as long as you feed in most of the control when rolling (elevator and rudder). Torque rolling is easy to do as well, the plane is very responsive when in the hover, and has the power (since its light) to pull out with authority.
3D Flight Performance Rating
(1 = worst / 10 = best)
Hovering: (10) Lots of control authority, and good power.
Torque Roll: (10) Same as hovering. Also, the speed of the torque is controllable, but it cannot be stopped.
Knife Edge: (9) Very little coupling, and has lots of authority.
Wall: (5) It climbs a bit, and like to do the "2 step" wall. if you roll in the elevator slowly, then it climbs, but is smooth.
Parachute: (6) Pulls out nicely, but nothing super dramatic.
Elevator: (7) Nose is not super high, but the plane is very stable.
Blender: (9) Rolls into the flat spin very nicely.
Harriers: (6) Takes a bit of work to keep the nose up, but it is stable. It is very sensitive to aileron input, I've never seen that in any other plane while in the harrier.
Inverted Harriers: (8) Stable, I need to work on mine though.
Snap Roll: (9) Very crisp, breaks nicely, and stops perfectly.
Knife Edge Spin: (8) Once you get them locked in, they look great.
Flat Spins: (7) Nice, could use a movement of CG towards the tail.
Inverted Flat Spins: (8) Very nice, will almost climb.