| |
| Author |
Message |
Meyrick
Site Admin

Joined: 15 Apr 2004
Posts: 1386
Location: Fremont, CA
|
 Posted: Fri Jan 07, 2005 7:34 pm Post subject: Himax 2812-0850 Outrunner & Diablo 3D BUILD thread |
|
|
Got my Himax 2812-0850 today. This thing comes will all the hardware you need to mount it and it's $30 cheaper than the AXI. This model also swings a 12x6 prop. This baby is going on my 2nd Diablo 3D.
- Attachments
-
 - Himax 2812-0850 Outrunner (everything you see is included for $65)
- himax.jpg (151.12 KB) Viewed 46648 times
-
- Diablo 3D (this is my 2nd one I'm making)
- diablo.jpg (84.15 KB) Viewed 46635 times
_________________
--Meyrick--
Last edited by Meyrick (not archived) on Fri Jan 07, 2005 9:17 pm, edited 1 time in total. |
|
| Back to top |
|
 |
john wondra
Joined: 05 May 2004
Posts: 362
Location: auburn, wa
|
|
| Back to top |
|
|
Meyrick
Site Admin
Joined: 15 Apr 2004
Posts: 1386
Location: Fremont, CA
|
| Posted: Fri Jan 07, 2005 8:21 pm Post subject: |
|
|
john wondra wrote:how much exactly did it cost?
Around $65 from http://www.b-p-p.com
_________________
--Meyrick-- |
|
| Back to top |
|
|
Ramz
Joined: 05 Nov 2004
Posts: 57
Location: New Brunswick, Canada
|
| Posted: Fri Jan 07, 2005 8:40 pm Post subject: |
|
|
Meyrick: you gonna make a vid when it gets done? I've yet to see a good vid of a foamy with a Hi-Max motor. For 65$ i'd be very interested to see what the rest of your setup is (or is going to be) and how it performs. Good luck with the Diablo. |
|
| Back to top |
|
|
Meyrick
Site Admin
Joined: 15 Apr 2004
Posts: 1386
Location: Fremont, CA
|
| Posted: Fri Jan 07, 2005 8:44 pm Post subject: I'm gonna make this a build thread. |
|
|
First thing, decide which plans will work for you. You can download full page or tiled. For the full plans, you can burn it into a CD and take it to Kinkos to have the plans printed on their wide b/w printer. The cost is around $5 or you can download the tiled version and print it with your printer and tape them together like a puzzle.
Once you have the full plans layed out, you will need to cut and separate the sections. wings, horizontal fuse, top fuse and bottom fuse, wheel pants, etc. DO NOT cut the actual line, leave a 1" or 1/2" border.
The horizontal section of the fuse can either be 3mm or 6mm. Make sure you cut the right lines for the right size you choose. The video with Mickey Crawley was constructed with a 3mm horizontal fuse.
- Attachments
-
- Diablo 3D plans
- diablo3d.jpg (40.15 KB) Viewed 46512 times
_________________
--Meyrick--
Last edited by Meyrick (not archived) on Fri Jan 07, 2005 11:08 pm, edited 2 times in total. |
|
| Back to top |
|
|
Meyrick
Site Admin
Joined: 15 Apr 2004
Posts: 1386
Location: Fremont, CA
|
| Posted: Fri Jan 07, 2005 8:48 pm Post subject: |
|
|
Ramz wrote:Meyrick: you gonna make a vid when it gets done? I've yet to see a good vid of a foamy with a Hi-Max motor. For 65$ i'd be very interested to see what the rest of your setup is (or is going to be) and how it performs. Good luck with the Diablo.
Yes, I will make a vid with this motor. My friend Motown has a Tensor 4D running these motors and they PERFORM....
_________________
--Meyrick-- |
|
| Back to top |
|
|
Meyrick
Site Admin
Joined: 15 Apr 2004
Posts: 1386
Location: Fremont, CA
|
| Posted: Fri Jan 07, 2005 9:02 pm Post subject: |
|
|
Once you have the sections cut out, you then spray 3M's artist's adhesive on the back side of the plans. After spraying let the liquid exposed for 20seconds then you appy the plans on top of the depron sheet. These sells for $12 a can at Office Depot or Office Max but they last for up to 20+ foamie plans.
Then you will need a hobby knife using #11 blades. Make sure you have a box or at least 30pieces. You can buy a 100 pieces from Tower Hobbies for $8. They dull very quickly. Also use a straight Edge when cutting the straight lines. I use two blades per section so the cuts are clean. That's how fast they get dull.
- Attachments
-
- 3M artist adhesive
- artistadhesive.jpg (107.83 KB) Viewed 46462 times
-
- #11 Blades
- no11blades.jpg (104.37 KB) Viewed 46415 times
-
- 36" straight edge
- ruler.jpg (144.7 KB) Viewed 46389 times
_________________
--Meyrick-- |
|
| Back to top |
|
|
Meyrick
Site Admin
Joined: 15 Apr 2004
Posts: 1386
Location: Fremont, CA
|
| Posted: Fri Jan 07, 2005 9:28 pm Post subject: Wings. |
|
|
Once you have the sections cut out and trimed. Do a dry fit and make sure eveything lines up. You then decide if you wanna paint it or use Zagi tape for schemes. I'm lazy so I do Zagi tape trim lines after it's built. But before I glue the pieces together, I'm gonna route the carbon tube channel for the wings.
To route the carbon tube tunnel for the wings, I use a dremel with a routing guide. I use a round bit (see pic below). The router guide I'm using measues 1-3/16" from the edge to the middle of the bit. So when you cut, measure 1-3/16" from the hinge line or tube line to the edge of the Straight Edge Ruler. Make sure you set the depth of the guide just about 3/16 of an inch deep. Run the router guide along the straight Edge. Do several passes so that it is clean. See sample pic below
Then to glue the 4mm carbon tube, you can use either Foam CA or RCZ56 clear glue. RCZ56 takes 20 hours to dry but works good.
- Attachments
-
- round bit
- carbonbit.jpg (52.1 KB) Viewed 46335 times
-
- Routing Wing
- routingwings.jpg (112.2 KB) Viewed 46303 times
-
- Wing done
- carbonroute.jpg (85.82 KB) Viewed 46261 times
-
- RC Z56 clear glue
- rcz56.jpg (73.95 KB) Viewed 46229 times
_________________
--Meyrick--
Last edited by Meyrick (not archived) on Fri Jan 07, 2005 10:55 pm, edited 3 times in total. |
|
| Back to top |
|
|
Meyrick
Site Admin
Joined: 15 Apr 2004
Posts: 1386
Location: Fremont, CA
|
| Posted: Fri Jan 07, 2005 9:39 pm Post subject: |
|
|
Now we do double beveling hinges by using a special triangle router. You would do the same cutting technique as you did with cutting the carbon tube tunnel on the wings. Using this bit, you can leave some thin depron skin that can act as hinges. But they will eventually break and separate so you still need to apply some Blenderm tape on top of the hinge line. Dubro makes 1" Blenderm tape that sells for $2.50.
- Attachments
-
- triangle bit double beveling
- hingebit1.jpg (58.39 KB) Viewed 46176 times
-
- triangle bit double beveling
- hingebit2.jpg (58.13 KB) Viewed 46370 times
-
- Aileron hinge line
- hingeline1.jpg (72.18 KB) Viewed 46351 times
-
- Elevator hinge line
- hingeline2.jpg (60.99 KB) Viewed 46070 times
-
- Blenderm Tape
- dubroblenderm.jpg (94.6 KB) Viewed 46038 times
_________________
--Meyrick-- |
|
| Back to top |
|
|
Meyrick
Site Admin
Joined: 15 Apr 2004
Posts: 1386
Location: Fremont, CA
|
| Posted: Fri Jan 07, 2005 9:50 pm Post subject: |
|
|
Once you have the hinges cut and carbon tube installed, you can now glue the fuse and wings together using Foam CA or the RCZ 56 glue. I use both. I first use the Foam CA to tack all the pieces together. The use of Foam safe accelerator can speed up the job. I then run some RCZ56 all aound the joint corners and run my finger thru it to remove the excess. Let the whole plane dry overnight.
Next will be the mounting of motor, servos, electronics, making of the pushrods, etc.
_________________
--Meyrick--
Last edited by Meyrick (not archived) on Fri Jan 07, 2005 11:29 pm, edited 1 time in total. |
|
| Back to top |
|
|
Tom Uhlendorf
Joined: 18 Sep 2004
Posts: 600
Location: Morgan Hill, CA
|
| Posted: Fri Jan 07, 2005 10:51 pm Post subject: |
|
|
I am kind of confused here. When applying the plans to the depron with super 77 and cutting the parts out. Do the plans just stay on there? Now I know they don't, so....?  |
|
| Back to top |
|
|
Meyrick
Site Admin
Joined: 15 Apr 2004
Posts: 1386
Location: Fremont, CA
|
| Posted: Fri Jan 07, 2005 10:56 pm Post subject: |
|
|
Tom Uhlendorf wrote:I am kind of confused here. When applying the plans to the depron with super 77 and cutting the parts out. Do the plans just stay on there? Now I know they don't, so....?
No they don't stay permanently. Remember IT IS NOT the Super 77, it is called 3M artist adhesive. It's sprayed on just to hold the plans on the depron. Once it is cut, you just peel off the plans.
_________________
--Meyrick-- |
|
| Back to top |
|
|
Tom Uhlendorf
Joined: 18 Sep 2004
Posts: 600
Location: Morgan Hill, CA
|
| Posted: Fri Jan 07, 2005 11:00 pm Post subject: |
|
|
Oh, I get you now. Thanks.  |
|
| Back to top |
|
|
Ac_Glenn
Joined: 12 Dec 2004
Posts: 16
|
| Posted: Sat Jan 08, 2005 8:39 am Post subject: |
|
|
| What is the Chord for the wing including the ailerons on this baby.... |
|
| Back to top |
|
|
Meyrick
Site Admin
Joined: 15 Apr 2004
Posts: 1386
Location: Fremont, CA
|
| Posted: Sat Jan 08, 2005 8:58 am Post subject: |
|
|
Ac_Glenn wrote:What is the Chord for the wing including the ailerons on this baby....
Here's the measurements.
- Attachments
-
- wingchord.jpg (74.17 KB) Viewed 45934 times
_________________
--Meyrick-- |
|
| Back to top |
|
|
Tom Uhlendorf
Joined: 18 Sep 2004
Posts: 600
Location: Morgan Hill, CA
|
| Posted: Sat Jan 08, 2005 10:11 am Post subject: |
|
|
| For the setup on the motor, do you still use the pheonix 25? |
|
| Back to top |
|
|
Meyrick
Site Admin
Joined: 15 Apr 2004
Posts: 1386
Location: Fremont, CA
|
| Posted: Sat Jan 08, 2005 11:30 am Post subject: |
|
|
Tom Uhlendorf wrote:For the setup on the motor, do you still use the pheonix 25?
Yes
_________________
--Meyrick-- |
|
| Back to top |
|
|
Meyrick
Site Admin
Joined: 15 Apr 2004
Posts: 1386
Location: Fremont, CA
|
| Posted: Sat Jan 08, 2005 11:43 am Post subject: |
|
|
Now for making the motor mount, I use a 1-1/2" hole saw with my drill press and make a 1-1/2" round mount from a 1/8" plywood. Test fit the motor with the motormount before you glue it to your plane.
- Attachments
-
- 1-1/2" hole saw
- 1-12holesaw.jpg (53.87 KB) Viewed 11268 times
-
- Made from 1/8" ply
- motormount.jpg (120.86 KB) Viewed 11261 times
-
- Motor mounted
- motormount2.jpg (67.76 KB) Viewed 11257 times
_________________
--Meyrick-- |
|
| Back to top |
|
|
Meyrick
Site Admin
Joined: 15 Apr 2004
Posts: 1386
Location: Fremont, CA
|
| Posted: Sat Jan 08, 2005 11:51 am Post subject: |
|
|
Next, glue the 1/8" mount to the firewall using a 5 minute epoxy. I also made some motor mount brace to stiffen up the front end. Also to give the motor some right thrust, I added a #2 washer on the left motor mount screw between the ply and the alluminum mount.
- Attachments
-
- Firewall brace
- mountbrace.jpg (127.75 KB) Viewed 11251 times
-
- Motor mounted
- motormounted.jpg (72.78 KB) Viewed 11252 times
-
- Motor mounted
- motormounted2.jpg (79.1 KB) Viewed 11241 times
_________________
--Meyrick-- |
|
| Back to top |
|
|
Meyrick
Site Admin
Joined: 15 Apr 2004
Posts: 1386
Location: Fremont, CA
|
| Posted: Sat Jan 08, 2005 11:53 am Post subject: |
|
|
Motor assembly is done. Next I will show you how I mount my servos.
_________________
--Meyrick-- |
|
| Back to top |
|
|
Meyrick
Site Admin
Joined: 15 Apr 2004
Posts: 1386
Location: Fremont, CA
|
| Posted: Sat Jan 08, 2005 2:18 pm Post subject: |
|
|
For mounting the servos, I like using a hot glue gun. You can pick up a mini hot glue gun from Wallgreens for $5.00. After you slide the servo in the servo cut outs, put some hot glue on where the servo and the depron meets and put it on just one side. The hot glue will not melt the depron but the tip of the gun can if you hold it there too long. I've never had a servo pop out by using this method and they are easy to remove when removing the servos.
- Attachments
-
- Mini Hot Glue Gun from Wallgreens for $5.00.
- hotgluegun.jpg (77.64 KB) Viewed 11222 times
-
- Aileron Servo
- aileronservo.jpg (76.28 KB) Viewed 11214 times
-
- Rudder Servo
- rudderservo.jpg (72.69 KB) Viewed 11202 times
_________________
--Meyrick-- |
|
| Back to top |
|
|
Meyrick
Site Admin
Joined: 15 Apr 2004
Posts: 1386
Location: Fremont, CA
|
| Posted: Sat Jan 08, 2005 2:24 pm Post subject: |
|
|
For control horns, I like using the E-Flite's horns. They are easy to mount and secured. I also like using Dubro's Mini EZ connectors, they make control rod adjustments a breeze.
- Attachments
-
- E-Flite Control horns. Pair for $2.00
- controlhorn.jpg (122.59 KB) Viewed 11194 times
-
- Control horns mounted on the ailerons
- controlhorn2.jpg (70.59 KB) Viewed 11188 times
_________________
--Meyrick-- |
|
| Back to top |
|
|
Meyrick
Site Admin
Joined: 15 Apr 2004
Posts: 1386
Location: Fremont, CA
|
| Posted: Sat Jan 08, 2005 2:26 pm Post subject: |
|
|
Next I will show you how I make my push rods.
_________________
--Meyrick-- |
|
| Back to top |
|
|
Meyrick
Site Admin
Joined: 15 Apr 2004
Posts: 1386
Location: Fremont, CA
|
| Posted: Sat Jan 08, 2005 5:16 pm Post subject: |
|
|
The following materials is what I used to make the push rods.
.080 carbon rod
.032 piano wire
1/8" heat shrink tubbing.
Dubro Mini EZ Link
First I would measure the distance between the servo horn to the control horn of the control surface. Subtract 2" from the total lenght and that's how long you would cut your carbon rod. For example if you measure 12" inches, you would make a 10" carbon rod. Next cut some .032 piano wires about 3" long. CA the piano wire to the carbon rod, just a drop of CA would do. (See pic below). Then put a 1/8" heat shrink tubing over the CA'd wire and carbon rod. (See pic below).
- Attachments
-
- CA the wire to the rod
- carod.jpg (68.93 KB) Viewed 11177 times
-
- Heat shrink tubing
- heatshrinkrod.jpg (89.2 KB) Viewed 11177 times
-
- Ailerons finished
- ailerons.jpg (64.13 KB) Viewed 11170 times
-
- Aileron's control rod installed with Dubro's EZ Link
- ailerons2.jpg (71.22 KB) Viewed 11166 times
_________________
--Meyrick-- |
|
| Back to top |
|
|
Meyrick
Site Admin
Joined: 15 Apr 2004
Posts: 1386
Location: Fremont, CA
|
| Posted: Sat Jan 08, 2005 5:19 pm Post subject: |
|
|
Here's some pictures of the Elevator and Rudder setup.
- Attachments
-
- Elevator & Rudder Servos shown
- elevator&rudder.jpg (119.7 KB) Viewed 11161 times
-
- Elevator horn with Dubro EZ Link
- elevatorhorn.jpg (90.52 KB) Viewed 11156 times
_________________
--Meyrick-- |
|
| Back to top |
|
|
Ac_Glenn
Joined: 12 Dec 2004
Posts: 16
|
| Posted: Sat Jan 08, 2005 5:21 pm Post subject: |
|
|
| Kool whats next. Im building my new Xitab 3d and following your build at the same time. |
|
| Back to top |
|
|
Meyrick
Site Admin
Joined: 15 Apr 2004
Posts: 1386
Location: Fremont, CA
|
| Posted: Sat Jan 08, 2005 5:28 pm Post subject: |
|
|
Ac_Glenn wrote:Kool whats next. Im building my new Xitab 3d and following your build at the same time.
It's almost done. Just gotta do the non functional landing gear. It's non functional but it is highly recommended. It improves the flight performance by eliminating the coupling on knife edge manuevers. Although you can op to using a functional gear.
_________________
--Meyrick-- |
|
| Back to top |
|
|
Ac_Glenn
Joined: 12 Dec 2004
Posts: 16
|
| Posted: Sat Jan 08, 2005 5:32 pm Post subject: |
|
|
| Is it goin to get any color. |
|
| Back to top |
|
|
Chris
Joined: 16 Apr 2004
Posts: 367
Location: Canada
|
| Posted: Sat Jan 08, 2005 8:12 pm Post subject: |
|
|
ofcourse..it's meyrick he dresses up his foamies like he dresses up his barbies
_________________
-Chris-
3D Foamy |
|
| Back to top |
|
|
Meyrick
Site Admin
Joined: 15 Apr 2004
Posts: 1386
Location: Fremont, CA
|
| Posted: Sat Jan 08, 2005 10:16 pm Post subject: |
|
|
The plans have a non functional gear and wheel pants drawn so you can make them out of depron. Even though they are non functional, it will greatly improve the flight characteristics.
First thing I would do is cut some landing gear support that gets glued with 5 minute epoxy on both sides of the fuse. This is done so incase you end up landing on the grass it will not rip the fuse. I made some round landing gear support (see pic below) out of 1/32" ply. I used a 1-1/8" hole saw to make the cut. Next, epoxy one of each on both sides of the fuse and clamp it. Once it's dry, drill the hole a little bit bigger and drill on an angle where you think the landing gear rod is going to be mounted. I used .080 carbon rod for the landing gear (see pic below).
- Attachments
-
- Gear plates made from 1/32" ply
- gearmount.jpg (119.55 KB) Viewed 11119 times
-
- Gear plates glued
- gearmount2.jpg (90.35 KB) Viewed 11118 times
-
- Landing gear from .080 carbon rod
- gearmount3.jpg (82.73 KB) Viewed 11113 times
-
- Landing gear done
- gearmount4.jpg (92.29 KB) Viewed 11110 times
_________________
--Meyrick--
Last edited by Meyrick (not archived) on Sat Jan 08, 2005 11:05 pm, edited 1 time in total. |
|
| Back to top |
|
|
Meyrick
Site Admin
Joined: 15 Apr 2004
Posts: 1386
Location: Fremont, CA
|
| Posted: Sat Jan 08, 2005 10:22 pm Post subject: |
|
|
My 2nd Diablo 3D is all dressed up. She's been scheme trimmed using Zagi color tapes. AUW is 13.8oz. with a 1320mah Thunder Power Pack.
Oh BTW, I did a thrust test with the HIMAX by just holding on to it and this baby PULLS Hard. It feels a tad stronger than the AXI and it's $30 cheaper.
- Attachments
-
- From the fron end
- diablo3d2.jpg (93.8 KB) Viewed 9763 times
-
- From the rear end
- diablo3d1.jpg (121.56 KB) Viewed 9767 times
_________________
--Meyrick-- |
|
| Back to top |
|
|
Meyrick
Site Admin
Joined: 15 Apr 2004
Posts: 1386
Location: Fremont, CA
|
| Posted: Sat Jan 08, 2005 10:29 pm Post subject: |
|
|
Here are a couple of Diablos, mine and Mickey's. The red one is the one that is on the video. Mickey used 3mm depron for the horizontal fuse, stabs, and elevators.
- Attachments
-
- diablos1.jpg (145.27 KB) Viewed 9755 times
-
- diablos2.jpg (122.14 KB) Viewed 9757 times
-
- diablos3.jpg (114.13 KB) Viewed 9735 times
-
- diablos4.jpg (135.13 KB) Viewed 9733 times
_________________
--Meyrick-- |
|
| Back to top |
|
|
Ramz
Joined: 05 Nov 2004
Posts: 57
Location: New Brunswick, Canada
|
| Posted: Sat Jan 08, 2005 10:42 pm Post subject: Diablo... |
|
|
| Very nice Meyrick. I'm a big fan of the graphids. Do you have an AUW of the one with the Hi-Max? I was thinkin of goin with that Hi-Max on my Foamtana instead of the AXI. the HImax looks really nice. |
|
| Back to top |
|
|
Meyrick
Site Admin
Joined: 15 Apr 2004
Posts: 1386
Location: Fremont, CA
|
| Posted: Sat Jan 08, 2005 10:59 pm Post subject: Re: Diablo... |
|
|
Ramz wrote:Very nice Meyrick. I'm a big fan of the graphids. Do you have an AUW of the one with the Hi-Max? I was thinkin of goin with that Hi-Max on my Foamtana instead of the AXI. the HImax looks really nice.
Sorry I didn't get to weight in just the motor. But my Diablo with the AXI weights 13.9oz. The Diablo with the Himax weights 13.8oz. So I would say the motors weight the same, but the Himax wins hands down with the price. I used identical hardware and servos for both planes. I can't wait to fly it so I can see how efficient and powerful it is compared to the more expensive AXI.
_________________
--Meyrick-- |
|
| Back to top |
|
|
Ramz
Joined: 05 Nov 2004
Posts: 57
Location: New Brunswick, Canada
|
| Posted: Sat Jan 08, 2005 11:31 pm Post subject: comparison... |
|
|
| Yeah me too. I'm thinkin about gettin the HImax for my Foamtana and i can't wait to see how is compares to the AXI. Could you tach the HImax and see how many rpm's it'll turn? It would be nice to see what motor will turn the same prop faster and how many amps it's drawing. I too am extremely interested in how they compare, because I live in Canada, I would be saving 50$ instead of 30$. Thanks Meyrick. |
|
| Back to top |
|
|
Meyrick
Site Admin
Joined: 15 Apr 2004
Posts: 1386
Location: Fremont, CA
|
| Posted: Sat Jan 08, 2005 11:35 pm Post subject: Re: comparison... |
|
|
Ramz wrote:Yeah me too. I'm thinkin about gettin the HImax for my Foamtana and i can't wait to see how is compares to the AXI. Could you tach the HImax and see how many rpm's it'll turn? It would be nice to see what motor will turn the same prop faster and how many amps it's drawing. I too am extremely interested in how they compare, because I live in Canada, I would be saving 50$ instead of 30$. Thanks Meyrick.
My Tach broke so I can't test it. But if weather is good tomorrow, I will let you know how it is.
_________________
--Meyrick-- |
|
| Back to top |
|
|
Meyrick
Site Admin
Joined: 15 Apr 2004
Posts: 1386
Location: Fremont, CA
|
| Posted: Sat Jan 08, 2005 11:39 pm Post subject: |
|
|
Also, because these planes have non functional landing gear, it is required to be hand launched and hand caught from a hover. If you are not familiar with a catching a foamie from a hover, you can have a friend catch it for you. Do not risk cutting yourself.
_________________
--Meyrick-- |
|
| Back to top |
|
|
Meyrick
Site Admin
Joined: 15 Apr 2004
Posts: 1386
Location: Fremont, CA
|
| Posted: Sun Jan 09, 2005 11:36 am Post subject: |
|
|
AXI 22/12/34 vs. HIMAX 2812-0850
- Attachments
-
- axivshimax.jpg (116.7 KB) Viewed 9682 times
-
- axivshimax2.jpg (86.73 KB) Viewed 9676 times
_________________
--Meyrick-- |
|
| Back to top |
|
|
3dbatixkid
Site Admin
Joined: 15 Apr 2004
Posts: 1545
Location: Sunnyvale, CA
|
|
| Back to top |
|
|
Meyrick
Site Admin
Joined: 15 Apr 2004
Posts: 1386
Location: Fremont, CA
|
| Posted: Sun Jan 09, 2005 6:14 pm Post subject: |
|
|
3dbatixkid wrote:Nice color scheme, whered you find that one?
:mrgreen:
_________________
--Meyrick-- |
|
| Back to top |
|
|
Meyrick
Site Admin
Joined: 15 Apr 2004
Posts: 1386
Location: Fremont, CA
|
| Posted: Sun Jan 09, 2005 7:20 pm Post subject: |
|
|
More Diablo Pics.
AXI vs. HIMAX drag race video coming up NEXT.....
- Attachments
-
- diablo1.jpg (137.38 KB) Viewed 9648 times
-
- diablo2.jpg (144.17 KB) Viewed 9649 times
-
- diablo3.jpg (124.11 KB) Viewed 9639 times
-
- diablo4.jpg (128.08 KB) Viewed 9633 times
_________________
--Meyrick-- |
|
| Back to top |
|
|
Ramz
Joined: 05 Nov 2004
Posts: 57
Location: New Brunswick, Canada
|
| Posted: Sun Jan 09, 2005 8:27 pm Post subject: Hi-Max |
|
|
| Any word on the Hi-Max yet? You hinted that it pulls really well. Any info would be appreciated. |
|
| Back to top |
|
|
Meyrick
Site Admin
Joined: 15 Apr 2004
Posts: 1386
Location: Fremont, CA
|
| Posted: Sun Jan 09, 2005 8:52 pm Post subject: Re: Hi-Max |
|
|
Ramz wrote:Any word on the Hi-Max yet? You hinted that it pulls really well. Any info would be appreciated.
I'll have the video up in an hour. It pulls really good just like the AXI. They are very comparible and I was able to get 18 minute flight times, just like the AXI. So they are basically the SAME but HIMAX is cheaper. One thing about the HIMAX, your prop must be drilled perfectly or it will vibrate like crazy because it uses a prop adapter with a spinner. Unlike the AXI the prop sits on the hub so the prop can be out of wack.
_________________
--Meyrick-- |
|
| Back to top |
|
|
Meyrick
Site Admin
Joined: 15 Apr 2004
Posts: 1386
Location: Fremont, CA
|
| Posted: Sun Jan 09, 2005 9:45 pm Post subject: |
|
|
Here's the Diablo Drag Race Video with me, Ken Gregory, & Mickey Crawley. I think I beat both of them. :mrgreen:
_________________
--Meyrick-- |
|
| Back to top |
|
|
Ramz
Joined: 05 Nov 2004
Posts: 57
Location: New Brunswick, Canada
|
| Posted: Sun Jan 09, 2005 10:29 pm Post subject: . |
|
|
| Right on. Looks like the HI-Max is a winner. I'm glad i bought it! Great vid! Keep'em comin. |
|
| Back to top |
|
|
Ramz
Joined: 05 Nov 2004
Posts: 57
Location: New Brunswick, Canada
|
| Posted: Tue Jan 18, 2005 7:13 pm Post subject: 2812-0850 prop mount. |
|
|
| Hey Meyrick. I was just wondering what kind of prop adapter you are using on your 2812-0850. The prop adapter that comes with it works ok but i'd like to have something a little more solid. Thanks. |
|
| Back to top |
|
|
Meyrick
Site Admin
Joined: 15 Apr 2004
Posts: 1386
Location: Fremont, CA
|
| Posted: Tue Jan 18, 2005 7:35 pm Post subject: Re: 2812-0850 prop mount. |
|
|
Ramz wrote:Hey Meyrick. I was just wondering what kind of prop adapter you are using on your 2812-0850. The prop adapter that comes with it works ok but i'd like to have something a little more solid. Thanks.
I'm using the one that came with it. I'm also gonna try the prop saver version that was included.
_________________
--Meyrick-- |
|
| Back to top |
|
|
Ramz
Joined: 05 Nov 2004
Posts: 57
Location: New Brunswick, Canada
|
| Posted: Tue Jan 18, 2005 8:07 pm Post subject: hhhmmmm |
|
|
| strange...mine never came with one.... |
|
| Back to top |
|
|
Meyrick
Site Admin
Joined: 15 Apr 2004
Posts: 1386
Location: Fremont, CA
|
| Posted: Tue Jan 18, 2005 8:09 pm Post subject: Re: hhhmmmm |
|
|
Ramz wrote:strange...mine never came with one....
Huh? It should have came just like this.
- Attachments
-
- himax.jpg (151.12 KB) Viewed 5292 times
_________________
--Meyrick-- |
|
| Back to top |
|
|
DTB
Joined: 24 Jul 2004
Posts: 507
Location: Danville, VA
|
| Posted: Tue Jan 18, 2005 10:20 pm Post subject: |
|
|
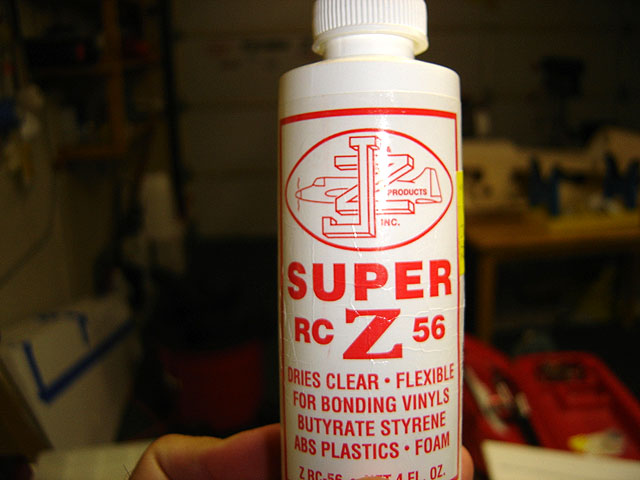
Do you think RCZ56 glue is the same as Pacer 560 Canopy glue. They look and say they do the same job. I have 560 glue already, but I could get the RCZ56 if I need to.

_________________
Fly it hard and hover it low...
My RC Photo Page |
|
| Back to top |
|
|
Meyrick
Site Admin
Joined: 15 Apr 2004
Posts: 1386
Location: Fremont, CA
|
| Posted: Wed Jan 19, 2005 10:23 pm Post subject: |
|
|
DTB wrote:Do you think RCZ56 glue is the same as Pacer 560 Canopy glue. They look and say they do the same job. I have 560 glue already, but I could get the RCZ56 if I need to.
Yes, they are the same.
_________________
--Meyrick-- |
|
| Back to top |
|
|
DTB
Joined: 24 Jul 2004
Posts: 507
Location: Danville, VA
|
| Posted: Sun Jan 23, 2005 12:36 pm Post subject: Re: hhhmmmm |
|
|
Ramz wrote:strange...mine never came with one....
Ramz, you may want to contact the place of the purhase. I received my combo (motor and ESC) last week and this is what was included. This motor is very nice.
- Attachments
-
- Himaxx 2812-0850.jpg (93.5 KB) Viewed 5217 times
_________________
Fly it hard and hover it low...
My RC Photo Page |
|
| Back to top |
|
|
Butthead
Joined: 08 Oct 2004
Posts: 1076
Location: Belvidere, NJ
|
| Posted: Sun Jan 23, 2005 12:40 pm Post subject: |
|
|
meyrick, do you nkow the link to the himax motors? i saw one link but they didnt have THIS motor on it.
thanks
_________________
John Paragallo
WildHare 35% Extra 330LX/ZDZ 120
Futaba 9C |
|
| Back to top |
|
|
Meyrick
Site Admin
Joined: 15 Apr 2004
Posts: 1386
Location: Fremont, CA
|
| Posted: Sun Jan 23, 2005 1:10 pm Post subject: |
|
|
TeamMoki3D wrote:meyrick, do you nkow the link to the himax motors? i saw one link but they didnt have THIS motor on it.
thanks
I bought mine from these guys. http://www.b-p-p.com
_________________
--Meyrick-- |
|
| Back to top |
|
|
DTB
Joined: 24 Jul 2004
Posts: 507
Location: Danville, VA
|
| Posted: Tue Jan 25, 2005 11:07 am Post subject: |
|
|
Himaxx 2812 series owners, I found this and thought I would post this for those that may possibly need one in the future. Accidents happen.
Here is a replacement shaft for the new 2812 series motors for $5.00.
Click --> 2812 Replacement Shaft

DTB
_________________
Fly it hard and hover it low...
My RC Photo Page |
|
| Back to top |
|
|
Meyrick
Site Admin
Joined: 15 Apr 2004
Posts: 1386
Location: Fremont, CA
|
| Posted: Tue Jan 25, 2005 11:08 am Post subject: |
|
|
Cool, right on.
_________________
--Meyrick-- |
|
| Back to top |
|
|
los08
Joined: 29 Jan 2005
Posts: 2
|
| Posted: Sat Jan 29, 2005 5:45 pm Post subject: |
|
|
What prop did you run on your HiMaxx 2812-850. I'm going to use
the same setup but not sure of the prop..
Los |
|
| Back to top |
|
|
Meyrick
Site Admin
Joined: 15 Apr 2004
Posts: 1386
Location: Fremont, CA
|
| Posted: Sat Jan 29, 2005 7:41 pm Post subject: |
|
|
los08 wrote:What prop did you run on your HiMaxx 2812-850. I'm going to use
the same setup but not sure of the prop..
Los
I'm running a GWS 12x6 and I get around a 15~18 minute flight time.
_________________
--Meyrick-- |
|
| Back to top |
|
|
DTB
Joined: 24 Jul 2004
Posts: 507
Location: Danville, VA
|
| Posted: Thu Feb 10, 2005 9:26 am Post subject: |
|
|
3dbatixkid wrote:Nice color scheme, whered you find that one?
Meyrick, I just saw Zac's Katana video.
You thief!!!!
Just kidding. I can't complain, I stole my Diablo's scheme also, I just changed the color from blue to yellow...
It's easier to copy than create 
_________________
Fly it hard and hover it low...
My RC Photo Page |
|
| Back to top |
|
|
Meyrick
Site Admin
Joined: 15 Apr 2004
Posts: 1386
Location: Fremont, CA
|
| Posted: Thu Feb 10, 2005 10:48 am Post subject: |
|
|
DTB wrote:3dbatixkid wrote:Nice color scheme, whered you find that one?
Meyrick, I just saw Zac's Katana video. You thief!!!! Just kidding. I can't complain, I stole my Diablo's scheme also, I just changed the color from blue to yellow... It's easier to copy than create
Guess who made that scheme for Zak? Me and Steve... :mrgreen:
_________________
--Meyrick-- |
|
| Back to top |
|
|
8KCABrett
Joined: 01 Feb 2005
Posts: 16
|
| Posted: Thu Feb 10, 2005 1:00 pm Post subject: |
|
|
Interesting powerplant, I think I might try that on something I just picked up as a gift for someone. . .
Do you happen to know how the 3M artist adhesive does when applied over another paint layer (on foam)? More to the point, if used to apply a mask will it lift the paint when removed?
Thanks!
_________________
-Brett
Team Raven
http://www.waynehandley.com
Northern California Aerobatic Club
http://www.iac38.org |
|
| Back to top |
|
|
Meyrick
Site Admin
Joined: 15 Apr 2004
Posts: 1386
Location: Fremont, CA
|
| Posted: Thu Feb 10, 2005 2:48 pm Post subject: |
|
|
8KCABrett wrote:Do you happen to know how the 3M artist adhesive does when applied over another paint layer (on foam)? More to the point, if used to apply a mask will it lift the paint when removed?
Thanks!
Yes it will pickup the paint off the foam.
_________________
--Meyrick-- |
|
| Back to top |
|
|
DTB
Joined: 24 Jul 2004
Posts: 507
Location: Danville, VA
|
| Posted: Thu Feb 10, 2005 7:09 pm Post subject: |
|
|
As I wait for my Phoenix 25 to be returned from CC, a buddy who flys foamys attached his Phx 25 and we ran my Himaxx 2812-0850 tonight. I was amazed at the power that little motor had as well as my buddy. He uses a Himaxx 2015-4100 with a gear box and is seriously thinking about changing out to the outrunner. I haven't flown my Diablo yet, but the plane was able to hover inside the house while I held it lightly at roughly 1/2 throttle. I can tell it is going to be plenty of power for this plane. The motor is very quiet compared to the geared systems.
My friend turned on his 2015-4100 and it was a lot louder than my outrunner due to the gearbox making all it's usual noise. The 2812-0850 has very good pull with a GWS 12x6.
_________________
Fly it hard and hover it low...
My RC Photo Page |
|
| Back to top |
|
|
Meyrick
Site Admin
Joined: 15 Apr 2004
Posts: 1386
Location: Fremont, CA
|
| Posted: Thu Feb 10, 2005 8:28 pm Post subject: |
|
|
Right on, you will have lots of fun with that thing.
_________________
--Meyrick-- |
|
| Back to top |
|
|
experimental_pilot
Joined: 11 Feb 2005
Posts: 19
Location: Toronto, Ontario Canada
|
| Posted: Fri Feb 11, 2005 5:08 pm Post subject: |
|
|
Hey all, I am very interested in building this airplane.
However Im not sure if the stuff I have will work.
Ill post pictures so you guys can see what I have and tell me what I could do.
I do plan on buying a few micro servos though.
Also where could I get the Depron Foam...Rona, Home Hardware?
and Chris do you ever fly at the Humber Valley RC club?
Edit: All the sizes are referenced to the AA battery.
Thanks
- Attachments
-
- Side view of my receiver.
- Feb11218.JPG (60.96 KB) Viewed 4219 times
-
- Here's my receiver from the Airtronics VG-6000 set.
- Feb11207.JPG (60.97 KB) Viewed 4217 times
-
- This is my ESC. Electrifly 30 amp.
- Feb11224.JPG (61.17 KB) Viewed 4215 times
-
- This is the motor. A speed 400 brushed.
- Feb11206.JPG (63.58 KB) Viewed 4213 times
-
- This is the battery. 9.6V 8cell NiCd.
- Feb11199.JPG (64.27 KB) Viewed 4215 times
_________________
Fight To Fly, Fly To Fight, Fight To Win. |
|
| Back to top |
|
|
Chris
Joined: 16 Apr 2004
Posts: 367
Location: Canada
|
| Posted: Fri Feb 11, 2005 5:37 pm Post subject: |
|
|
If you could list the stuff you have it would be easier for us to see like motor and such as the pics are dark, that looks like a RC car battery and IMHO would be too heavy for this plane and probley can;t handle the amps.
I used to fly there I was a member there last year but am not this year.
_________________
-Chris-
3D Foamy |
|
| Back to top |
|
|
experimental_pilot
Joined: 11 Feb 2005
Posts: 19
Location: Toronto, Ontario Canada
|
| Posted: Fri Feb 11, 2005 6:30 pm Post subject: |
|
|
Chris wrote:If you could list the stuff you have it would be easier for us to see like motor and such as the pics are dark, that looks like a RC car battery and IMHO would be too heavy for this plane and probley can;t handle the amps.
I used to fly there I was a member there last year but am not this year.
Well the ESC is an Electrifly C-30 Mini High Power. The battery is a car battery from radio shack(9.6V NiCd, 1000mAh). Im planning to get a Li-Po. What Li-Po do you think I should get and what charger?
I do not know anything about the motor. It is speed 400 and came with my Great Planes Firebat kit. The size can be seen in the picture with reference to the battery. The length of it is roughly 3.8cm.
The receiver's dimensions are 5.5x2.0x2.2cm and it is the 6 channel receiver that comes with the VG-6000.
Also what micro servos would you recomend, taking into account price?
Chris, Im thinking of buying one of your kits. The shipping should be cheap or maybe you could just hand it to me at HVRCF.
Thanks
_________________
Fight To Fly, Fly To Fight, Fight To Win. |
|
| Back to top |
|
|
Chris
Joined: 16 Apr 2004
Posts: 367
Location: Canada
|
| Posted: Fri Feb 11, 2005 7:03 pm Post subject: |
|
|
kits? I have kits? IF you mean 3dfoamy.com I don;t make the kits I'm just sponsored by them, anyways uhhhh for a lipo i would get a 1200mah 3s e-tec from http://www.backyardflying.com and do you have the hobbico quick field charger mkII cause that will do lipo's it;s all i use.
_________________
-Chris-
3D Foamy |
|
| Back to top |
|
|
experimental_pilot
Joined: 11 Feb 2005
Posts: 19
Location: Toronto, Ontario Canada
|
| Posted: Fri Feb 11, 2005 7:22 pm Post subject: |
|
|
No, I dont have that charger. Do Brushed motors work with Li-Po's?
Do you recommend that I make this Diablo...or buy a kit form 3Dfoamy?
Be honest please, just forget that they sponsor you for just a minute or two. lol.
What all would I need to buy to complete one of those kit's from 3Dfoamy?
I would like to use as much of the stuff that I already have, so I won't have to spend too much.
Do these foamies fly easy?
Thanks
_________________
Fight To Fly, Fly To Fight, Fight To Win. |
|
| Back to top |
|
|
Chris
Joined: 16 Apr 2004
Posts: 367
Location: Canada
|
| Posted: Fri Feb 11, 2005 7:27 pm Post subject: |
|
|
i woudl suggest you make one of the diablos or something liek it so you don;t spend as much money on a 3df kit to find out you don;t like it or whatever and this way if you buy a kit one day you will be able to build it better and lighter ya know, your stuff will work and you will want like a 12x3.7 prop on that motor and put it in a "d" gws gearbox umm it will work with lipos but remember to make sure oyu be very careful with lipos and thats the only change i would make is your battery everything else should work fine, you could also take your rx outta the case to save some weight.
_________________
-Chris-
3D Foamy |
|
| Back to top |
|
|
experimental_pilot
Joined: 11 Feb 2005
Posts: 19
Location: Toronto, Ontario Canada
|
| Posted: Fri Feb 11, 2005 7:54 pm Post subject: |
|
|
Yea, I agree with the Diablo. Where do you get your Depron from?
What special considerations should I take with Li-Po's?
Is it absolutely necessary that I get mini servos?
Would it be cheaper to by the prop, battery etc... at HobbyHobby or...?
How long should the Etec 1200HP mAh 3S1P 11.1V, would last with my motor?
Thanks!!
_________________
Fight To Fly, Fly To Fight, Fight To Win. |
|
| Back to top |
|
|
DTB
Joined: 24 Jul 2004
Posts: 507
Location: Danville, VA
|
| Posted: Fri Feb 11, 2005 8:05 pm Post subject: |
|
|
experimental_pilot wrote:Yea, I agree with the Diablo. Where do you get your Depron from?
What special considerations should I take with Li-Po's?
Is it absolutely necessary that I get mini servos?
Would it be cheaper to by the prop, battery etc... at HobbyHobby or...?
How long should the Etec 1200HP mAh 3S1P 11.1V, would last with my motor?
Thanks!!
Everything you need to know about Li-polys and other batteries also.
http://www.rcbatteryclinic.com/
http://www.depronusa.com has the foam if you need to order it, but other places sell it also. Best place depends on the best price, availabilty, etc... Some LHS don't carry everything you need, but some do, but jack up the price. Depends on how fast you want the items also.
Li-po's demand respect and if you give that to them, you should be fine. Read any and everything you can on these batteries to make sure you know how to charge them correctly.
_________________
Fly it hard and hover it low...
My RC Photo Page |
|
| Back to top |
|
|
experimental_pilot
Joined: 11 Feb 2005
Posts: 19
Location: Toronto, Ontario Canada
|
| Posted: Fri Feb 11, 2005 8:21 pm Post subject: |
|
|
I was asking Chris about the Depron and stuff because he/she lives in the same city as me and would know the cheapest way.
Thanks for the batteryclinic link.
_________________
Fight To Fly, Fly To Fight, Fight To Win. |
|
| Back to top |
|
|
DTB
Joined: 24 Jul 2004
Posts: 507
Location: Danville, VA
|
| Posted: Fri Feb 11, 2005 8:32 pm Post subject: |
|
|
experimental_pilot wrote:I was asking Chris about the Depron and stuff because he/she lives in the same city as me and would know the cheapest way.
Thanks for the batteryclinic link.
Sure thing, Glad I could help...
I not trying to scare you, but I want you to be aware of the possible danger that Lithium batteries can pose. Do your research in full.
If you overcharge them they will start swelling and later do what is called "Flame Venting". That is the worse case scenerio (NOT GOOD and VERY DANGEROUS).
Click here to see worst case scenerio -> Overcharged Lithium Battery
_________________
Fly it hard and hover it low...
My RC Photo Page |
|
| Back to top |
|
|
Chris
Joined: 16 Apr 2004
Posts: 367
Location: Canada
|
| Posted: Fri Feb 11, 2005 10:50 pm Post subject: |
|
|
experimental_pilot wrote:I was asking Chris about the Depron and stuff because he/she lives in the same city as me and would know the cheapest way.
Thanks for the batteryclinic link.
That would be HE! lol anyways Hobby hobby is too expensive for electric stuff it would be cheaper for you to get your batteries from backyard flying, also http://www.goldscallop.com is in scarbrough and he has depron and is a really nice guy to deal with.
_________________
-Chris-
3D Foamy |
|
| Back to top |
|
|
| 60 posts here were not archived |
staudacher
Joined: 05 Mar 2005
Posts: 3
Location: SE Minnesota
|
| Posted: Sun Mar 06, 2005 2:50 pm Post subject: |
|
|
| minnzoo wrote: | | So you brushed on the Shortcuts? Looks sprayed on. |
It's sprayed on. |
|
| Back to top |
|
|
-3de-
Joined: 25 Sep 2004
Posts: 81
Location: Reno----911
|
| Posted: Tue Mar 08, 2005 2:44 pm Post subject: |
|
|
Well I flew mine today. It weighs in at 20 oz. as I used Sturdy-Board as it was all I could come up with until I get some Depron. I must say, it flys awesome! Flys very straight and much more like a plane than my E-flight ultimate. Knife edge is great, a little more wing rock in harrier than my Ultimate, which I was expecting. I'm very pleased!
Now the bad. My first flight I was putting it through the paces, and was on a knife edge pass and threw the prop, followed by hitting a POLE!!  ah man. I couldn't believe it! It broke the fuse in the horizontal just behind the wing. Oh well, I picked it up, fixed it ant took it back out for another flight. It flys just the same, great! I'm going to cut out another one tomorrow. I'm really surprised at how true this plane flys compared to me Ultimate.  It does great 1 1/4 snaps to knife edge.
Hey, whats your guys Diablos made from Depron weighing in at? |
|
| Back to top |
|
|
DTB

Joined: 24 Jul 2004
Posts: 449
Location: Jackson, MS
|
| Posted: Tue Mar 08, 2005 2:59 pm Post subject: |
|
|
| -3de- wrote: | Well I flew mine today. It weighs in at 20 oz. as I used Sturdy-Board as it was all I could come up with until I get some Depron. I must say, it flys awesome! Flys very straight and much more like a plane than my E-flight ultimate. Knife edge is great, a little more wing rock in harrier than my Ultimate, which I was expecting. I'm very pleased!
Now the bad. My first flight I was putting it through the paces, and was on a knife edge pass and threw the prop, followed by hitting a POLE!! ah man. I couldn't believe it! It broke the fuse in the horizontal just behind the wing. Oh well, I picked it up, fixed it ant took it back out for another flight. It flys just the same, great! I'm going to cut out another one tomorrow. I'm really surprised at how true this plane flys compared to me Ultimate. It does great 1 1/4 snaps to knife edge.
Hey, whats your guys Diablos made from Depron weighing in at? |
Good deal dude. Glad you had a good flight except the pole kiss.
My Diablo weighs in RTF with battery at 13 oz
_________________
Fly it hard and hover it low...
My RC Photo Page |
|
| Back to top |
|
|
-3de-
Joined: 25 Sep 2004
Posts: 81
Location: Reno----911
|
| Posted: Tue Mar 08, 2005 3:18 pm Post subject: |
|
|
Yeah, I cant wait to build one out of depron. I wish I could find some in my area (Reno) rather than having to order it online. 
Man, 13 oz! Must fly sweet! |
|
| Back to top |
|
|
minnzoo
Joined: 27 Feb 2005
Posts: 30
Location: Conestoga, Pa.
|
| Posted: Wed Mar 09, 2005 7:05 pm Post subject: |
|
|
| I should be getting my foam and CF tomorrow . I can't wait to start building. |
|
| Back to top |
|
|
DTB
Joined: 24 Jul 2004
Posts: 449
Location: Jackson, MS
|
| Posted: Wed Mar 09, 2005 7:15 pm Post subject: |
|
|
| -3de- wrote: | Yeah, I cant wait to build one out of depron. I wish I could find some in my area (Reno) rather than having to order it online.
Man, 13 oz! Must fly sweet! |
It is a sweet flyer...
Everyone that is building one or going to build one is going to love it. I had to remove the non-functioning landing gear section, but kept the CF support that attaches to the fuse from the wings to keep the strength there. I fly outside mostly and catching the plane in a hover isn't always possible especially in 15 MPH winds we have here this time of year. I ripped the LG off several times already, so I just removed it but kept the CF support for strentgh. Still flys great.
DTB
_________________
Fly it hard and hover it low...
My RC Photo Page |
|
| Back to top |
|
|
Meyrick
Site Admin

Joined: 15 Apr 2004
Posts: 1312
Location: Fremont, CA
|
| Posted: Wed Mar 09, 2005 8:11 pm Post subject: |
|
|
| DTB wrote: | I fly outside mostly and catching the plane in a hover isn't always possible especially in 15 MPH winds we have here this time of year. I ripped the LG off several times already, so I just removed it but kept the CF support for strentgh. Still flys great.
DTB |
Or you can build a functional landing gear version like shown on the FoameIIx thread. 
_________________
--Meyrick-- |
|
| Back to top |
|
|
DTB
Joined: 24 Jul 2004
Posts: 449
Location: Jackson, MS
|
| Posted: Wed Mar 09, 2005 8:17 pm Post subject: |
|
|
| Meyrick wrote: | | DTB wrote: | I fly outside mostly and catching the plane in a hover isn't always possible especially in 15 MPH winds we have here this time of year. I ripped the LG off several times already, so I just removed it but kept the CF support for strentgh. Still flys great.
DTB |
Or you can build a functional landing gear version like shown on the FoameIIx thread. |
Yes, I thought about that also. If/when I make another, I may do that.
Thanks
_________________
Fly it hard and hover it low...
My RC Photo Page |
|
| Back to top |
|
|
fly boy 1

Joined: 12 Nov 2004
Posts: 250
Location: Milwaukee,WI
|
| Posted: Mon Mar 14, 2005 5:08 pm Post subject: |
|
|
This may sound like a stupid question,  but how do you make the motor mount braces/supports. I have looked at the pictures, but I can't figure it out. Can you help me Meyrick?  |
|
| Back to top |
|
|
minnzoo
Joined: 27 Feb 2005
Posts: 30
Location: Conestoga, Pa.
|
| Posted: Tue Mar 15, 2005 5:49 pm Post subject: |
|
|
What batteries is everyone using? I fly TP2100's in my Trex and I think I may try one of these in my Diablo before I go buy a 1350. 3de says his Diablo weighs 20oz with sturdyboard and DTB says his is 13oz with Depron. Well I am using Depron and the only weight difference between a 1350 and a 2100 is about 2 oz. That puts my guess weight @ 15 ounces. Anyone have any thoughts?
David |
|
| Back to top |
|
|
minnzoo
Joined: 27 Feb 2005
Posts: 30
Location: Conestoga, Pa.
|
| Posted: Wed Mar 16, 2005 4:42 pm Post subject: |
|
|
| Are those GWS 10x4.7 props I am seeing on Meyrick's Diablo's. I can't find the GWS 12x6 or APC 12x3.8. |
|
| Back to top |
|
|
DTB
Joined: 24 Jul 2004
Posts: 449
Location: Jackson, MS
|
| Posted: Wed Mar 16, 2005 5:01 pm Post subject: |
|
|
| minnzoo wrote: | | Are those GWS 10x4.7 props I am seeing on Meyrick's Diablo's. I can't find the GWS 12x6 or APC 12x3.8. |
Meyrick is using the GWS 12x6, but you can try the E-flight 12x6 or 12x3.8. I have both in the e-flight and the 12x6 is the best performer and doesn't flex like the GWS, but isn't as stiff as the APC so landing not so perfect isn't a tragedy. I originally tried the GWS and it flexed too much at WOT for my taste in a vertical climb out.
The 12x3.8 feels a little like a slipped clutch in an automobile, but the 12x6 has the bite you want. The GWS and the E-flight 12x6 is the best size.
_________________
Fly it hard and hover it low...
My RC Photo Page |
|
| Back to top |
|
|
slowracing

Joined: 18 Apr 2005
Posts: 26
Location: Williamsburg, VA
|
| Posted: Mon Apr 18, 2005 1:03 am Post subject: Zagi tape |
|
|
First let me say what a great thread this is. I have the plans printed and am awaiting my Depron, so the reading/info has been great. Can't wait to get started!!
Quick question...where does one find the Zagi Tape?
Regards
_________________
www.sloweracing.com
www.octaneonline.com |
|
| Back to top |
|
|
DTB
Joined: 24 Jul 2004
Posts: 449
Location: Jackson, MS
|
| Posted: Mon Apr 18, 2005 2:49 am Post subject: Re: Zagi tape |
|
|
| slowracing wrote: | First let me say what a great thread this is. I have the plans printed and am awaiting my Depron, so the reading/info has been great. Can't wait to get started!!
Quick question...where does one find the Zagi Tape?
Regards |
I used Trick RC Tape which is the same I imagine and it works great. I got it from Tower
Click Here...
_________________
Fly it hard and hover it low...
My RC Photo Page |
|
| Back to top |
|
|
slowracing
Joined: 18 Apr 2005
Posts: 26
Location: Williamsburg, VA
|
|
| Back to top |
|
|
| 60 posts here were not archived |
Rodrigo Stange
Joined: 08 Jul 2005
Posts: 9
|
| Posted: Mon Aug 01, 2005 7:20 am Post subject: |
|
|
I have the same problem with my GWS props. The sound it´s terrible. I´ll try the APC too.
The plane it´s fabulous.
_________________
3D? I´m in!!!
CAP 232 40% - ZDZ 160B2 Champion
LASER 200 33% - ZDZ 80RV
FLIP 3D 25 - OS 32SX
DIABLO 3D - Himax 2812-0850 |
|
| Back to top |
|
|
wvl
Joined: 01 Aug 2005
Posts: 6
Location: Belgium - Oostrozebeke
|
| Posted: Mon Aug 01, 2005 8:38 am Post subject: GWS vs. APC |
|
|
I have just tried the APC: no vibration sounds anymore. But I think the axi just has not enough power to turn this huge 12 x 6 at WOT. Vertical acceleration is a lot less than with the GWS prop. The plane flies around without any problems, but it is slower (you can fly at zero ground speed with some wind). It also brakes nicely on low rpm. The axi barely gets warm.
I think an APC 11 x 6 or so will do better, for some more speed and some less amps drawn from the motor.
Maybe there's a trick to drill out the GWS props nicely? Did anyone try the setup of a GWS hub with O-rings (propsaver) for this size of props? Does this work?
In the mean time, I flying figures I've never done before. 
_________________
flying is not dangerous; crashing is. |
|
| Back to top |
|
|
DTB
Joined: 24 Jul 2004
Posts: 449
Location: Jackson, MS
|
| Posted: Mon Aug 01, 2005 10:07 am Post subject: Re: GWS vs. APC |
|
|
| wvl wrote: |
Maybe there's a trick to drill out the GWS props nicely? Did anyone try the setup of a GWS hub with O-rings (propsaver) for this size of props? Does this work?
In the mean time, I flying figures I've never done before. |
I use a drill press. I start with a smaller drill bit and work my way up to the size I want it to be. This seems to keep the hold nice and centered. Start with a bit slightly bigger than the hole there and go up in size until you get to the size required. Takes a little time, but it works great and keeps the holed centered. The APC is a done deal when you buy it as you mentioned which is nice. I don't like the APC 12x3.8 and I thought the 12X6 would be a little much for these motors although I haven't tried a APC 12x6. I would like to try a APC 11x5.5 or 11x7.
I tried the prop saver and that POS flew off and mess the front of my diablo up when I first made it. I don't trust it, but many have used it successfully. Maybe I didn't know what I was doing, but I did it the way it was suppose to be done. I've read on other forums about the prop saver doing the same thing to them as well.
_________________
Fly it hard and hover it low...
My RC Photo Page |
|
| Back to top |
|
|
wvl
Joined: 01 Aug 2005
Posts: 6
Location: Belgium - Oostrozebeke
|
| Posted: Mon Aug 01, 2005 11:35 am Post subject: GWS rip |
|
|
just did the trick with the different bits on a black GWS prop. It looked good, but I had to shave off one blade to balance the prop ... took me 20 min.
Still that same horrific noise. Maybe it's prop flutter, or GWS is just meant for toys 
I have posted a pic with my diablo. No gear, as I often land in (tall) grass.
One other thing: I have a Jeti 18A controller. It makes the axi produce a very loud high pitch tone, I mean really loud. The chopper frequency must be high here, but man I am getting hearing damage....It just sounds like a turbine (in one way I like it)
grts.
| Description: |
|
| Filesize: |
203.38 KB |
| Viewed: |
598 Time(s) |
|
_________________
flying is not dangerous; crashing is. |
|
| Back to top |
|
|
DTB
Joined: 24 Jul 2004
Posts: 449
Location: Jackson, MS
|
| Posted: Mon Aug 01, 2005 2:06 pm Post subject: Re: GWS rip |
|
|
| wvl wrote: | just did the trick with the different bits on a black GWS prop. It looked good, but I had to shave off one blade to balance the prop ... took me 20 min.
Still that same horrific noise. Maybe it's prop flutter, or GWS is just meant for toys |
GWS will make the noise if the prop is out of balance. If you hold the plane and give it throttle, how many blade tips do you see? You should see one continuace blade, but if you see two then there is your problem. The prop needed to be shaved off on the front of the hub to allow it to fit better, the back of the hub should be left alone. If you shaved the rear of the hub, then it is out of balance and will cause that humming sound when it spins up faster. Mine did the same thing with my first GWS, but I learned to only shave the front of the hub.
| wvl wrote: | | I have posted a pic with my diablo. No gear, as I often land in (tall) grass. |
I have no gear also as I fly in grass often also. It flys very good still with no gear.
| wvl wrote: | One other thing: I have a Jeti 18A controller. It makes the axi produce a very loud high pitch tone, I mean really loud. The chopper frequency must be high here, but man I am getting hearing damage....It just sounds like a turbine (in one way I like it)
grts. |
My phx 25 makes my Himaxx squell loudly also. I have the brake function enabled on mine and if I do an elevator with no power and start up again, the motor will squell loudly. It isn't terribly loud, but loud enough for others to ask me what that noise is. I'm not losing any hearing from the noise so I guess mine isn't as loud as yours. [/quote]
_________________
Fly it hard and hover it low...
My RC Photo Page |
|
| Back to top |
|
|
wvl
Joined: 01 Aug 2005
Posts: 6
Location: Belgium - Oostrozebeke
|
| Posted: Mon Aug 01, 2005 11:54 pm Post subject: gws - APC |
|
|
I have only shortened the hub on the front side of the GWS, as I also took the back as a reference. With shaving off one blade, I meant removing plastic from one prop side to make it lighter and balance.
The trick with the blade counting is known from helicopter balancing. I also had a look at it with all the props I tried. The point is, that GWS is thin and made from ABS, a plastic that can be thermo-formed and is not particularly stable. But it is light and cheap.
APC is made from glassfiber filled nylon, a technical plastic that performs better, but is more expensive.
I think I 'll stay away from GWS; or I might try the propsaver setup.
[/quote]
_________________
flying is not dangerous; crashing is. |
|
| Back to top |
|
|
Rcmatt1234
Joined: 14 Sep 2005
Posts: 2
|
| Posted: Wed Sep 14, 2005 3:47 am Post subject: |
|
|
| I am building a extra 330 for a school project (don't ask i'm 11 and obsesed) any tips like can I glue the cf in with CA
|
|
| Back to top |
|
|
Butthead

Joined: 08 Oct 2004
Posts: 1045
Location: Belvidere, NJ
|
| Posted: Wed Sep 14, 2005 4:06 am Post subject: |
|
|
| Rcmatt1234 wrote: | | I am building a extra 330 for a school project (don't ask i'm 11 and obsesed) any tips like can I glue the cf in with CA |
if you're not planning on flying it then i guess that would be fine. but if you plan on flying it, use RC56 or Gorilla Glue.
_________________
John Paragallo
WildHare RC Extra 330LX 36%/ZDZ 120
Hangar-9 Extra 260 27%/ZDZ 50
Futaba 9C |
|
| Back to top |
|
|
Rcmatt1234
Joined: 14 Sep 2005
Posts: 2
|
| Posted: Sun Sep 18, 2005 6:10 am Post subject: |
|
|
yes i am flying it my school has a football field
i have finished cuting out the parts the olny problem is i am using 5mm depronn so i have to adjust the cut lines on the vertocal fuslage part ( they have lines for 3mm or 6mm)
|
|
| Back to top |
|
|
craigman

Joined: 31 May 2004
Posts: 104
Location: Redding, CA
|
| Posted: Sun Nov 06, 2005 4:45 pm Post subject: |
|
|
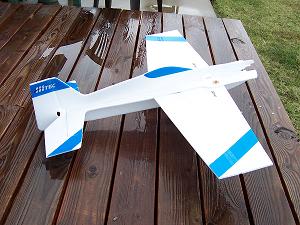
Welp, finally got off my lazy a$$ and built my Diablo. Still have to put some wheel pants on, and install the radio gear.
It's pretty basic. I'll dress it up more later!
| Description: |
|
| Filesize: |
26.16 KB |
| Viewed: |
145 Time(s) |
|
| Description: |
|
| Filesize: |
27.19 KB |
| Viewed: |
146 Time(s) |
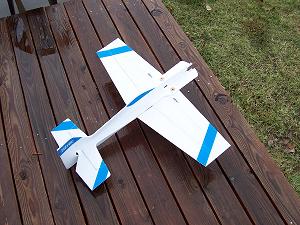
|
|
|
| Back to top |
|
|
| 5 posts here were not archived |
julmar
Joined: 24 Jan 2006
Posts: 2
|
| Posted: Thu Jan 26, 2006 1:14 pm Post subject: |
|
|
| many thanks |
|
| Back to top |
|
|
atique
Joined: 30 Dec 2005
Posts: 3
|
| Posted: Fri Jan 27, 2006 12:16 am Post subject: thanks alot dtb |
|
|
| dtb thanks alot for the advice. i will try to do it today |
|
| Back to top |
|
|
| 13 posts here were not archived |
CoMp ArF KiD
Joined: 28 Dec 2006
Posts: 50
Location: Los Altos Ca
|
| Posted: Sun Jan 21, 2007 4:59 pm Post subject: |
|
|
i had this foamie i stayed up all night trying to get it done so i was really mad the next day i go to maiden it and i fly it around like i stole it doing full throttle rolling cirles.... then well long story short make sre the motor mount is glued to the plane before u go to fly it. i did a full throttle snap then the plane ate it self.

_________________
Todd Bridges
Low Slow And Rolling
.
.
.
.Yah i wish i were sponsored! |
|
| Back to top |
|
|
3dbatixkid
Site Admin

Joined: 15 Apr 2004
Posts: 1514
Location: Sunnyvale, CA
|
|
| Back to top |
|
|
arauser
Joined: 27 Jan 2007
Posts: 1
|
| Posted: Wed Jan 31, 2007 7:04 pm Post subject: |
|
|
First, hats off to the designer of the Diablo, its the best flying foamy i've ever scratch built. The video is awesome too.I know this thread is over a year old but I'm realy enjoying this plane, so much that I've built two of them in the past month. My first is with a 24" wing span, E-flight 250 outrunner, 500mah 2 cell common sense battery, and an all-up flying weight of 4.5 oz. Flies good,just using a whole lot of expo.
My second is normal size and can't believe how good it flies. Ready to fly at 12.5oz it just floats,so graceful in the air,and hovers so easy it even makes me look good. I know theres been discussion on motor choices but I'm having real good luck with the Himax 2808-980 and 10/47 APC prop.Very easy on batteries, 10 plus minutes on a 700 mah 3 cell.
both planes have same color scheme,look real cool together.
Jeff
|
|
| Back to top |
|
|
thedonski
Joined: 13 Dec 2006
Posts: 5
|
| Posted: Sat Mar 10, 2007 1:40 pm Post subject: |
|
|
What throws are you using for the elevator, ailerons, and rudder on the diablo for high and low rates?
-Ryan
|
|
| Back to top |
|
|
thedonski
Joined: 13 Dec 2006
Posts: 5
|
| Posted: Sun Mar 11, 2007 9:24 am Post subject: |
|
|
Thanks Zak for your email! I am pretty new to 3d flying so I didn't know that you just want the most possible throws out of the control surfaces. He told me too that you want about 50% of the high rate throws for the low rates. Then dial up the exp as needed.
-Ryan
|
|
| Back to top |
|
|
rcnxs
Joined: 20 Mar 2007
Posts: 1
|
|
| Back to top |
|
|
bronney
Joined: 24 Mar 2007
Posts: 4
|
| Posted: Sat Mar 24, 2007 5:47 am Post subject: Thanks Mickey and Steven. |
|
|
Here's a big thanks all the way from Hong Kong. I am ready to rock and roll! This is 75% scale of the plan. I plan to use a small motor on it but I am not sure yet. Easier to carry when you don't have a car. 
EDIT: I couldn't go to sleep without cutting it lol. It's 4:43am here! and well, this plane is so cool I can feel it in the air real soon.
| Description: |
|
| Filesize: |
39.62 KB |
| Viewed: |
312 Time(s) |
|
| Description: |
|
| Filesize: |
49.9 KB |
| Viewed: |
312 Time(s) |
|
| Description: |
|
| Filesize: |
69.28 KB |
| Viewed: |
319 Time(s) |
|
|
|
| Back to top |
|
|
3dbatixkid
Site Admin
Joined: 15 Apr 2004
Posts: 1514
Location: Sunnyvale, CA
|
|
| Back to top |
|
|
bronney
Joined: 24 Mar 2007
Posts: 4
|
| Posted: Fri Mar 30, 2007 9:53 am Post subject: where to glue? |
|
|
Meyrick, this is my first scratch build foamie.. I am wondering how to glue the wings to the fuse. You know that 6mm strut from the fuse cutout that pokes thru the wings, should I glue that too? And the large area where the wing slaps up to the under fuse, do I glue the whole area?
I get the running glue around corner thing much like bathtub silicons but just don't wanna put on too much glue to add weight..
Thanks. Oh I kinda painted the wings
| Description: |
|
| Filesize: |
63.15 KB |
| Viewed: |
257 Time(s) |
|
|
|
| Back to top |
|
|
Meyrick
Site Admin
Joined: 15 Apr 2004
Posts: 1379
Location: Fremont, CA
|
| Posted: Fri Mar 30, 2007 10:59 am Post subject: Re: where to glue? |
|
|
| bronney wrote: | | Meyrick, this is my first scratch build foamie.. I am wondering how to glue the wings to the fuse. You know that 6mm strut from the fuse cutout that pokes thru the wings, should I glue that too? And the large area where the wing slaps up to the under fuse, do I glue the whole area? |
Yes, glue everything that touches each other. Use a brush on the wide area to spread the glue. Use either a Foam safe CA or canopy glue.
_________________
--Meyrick-- |
|
| Back to top |
|
|
bronney
Joined: 24 Mar 2007
Posts: 4
|
| Posted: Sat Mar 31, 2007 12:36 am Post subject: |
|
|
Thanks Meyrick I need a brush then I think I'll end up using uhu por. I am just not that quick on alignment.
[edit]: and here's after 4 nites of work. Man my day job really kills.
[edit2]: and here's with the stickers. Avery A4 clear label with inkjet. Takes 1 day for the ink to dry for handling. 3Dbatix 4ever!
| Description: |
|
| Filesize: |
41.6 KB |
| Viewed: |
168 Time(s) |
|
| Description: |
|
| Filesize: |
39.22 KB |
| Viewed: |
168 Time(s) |
|
|
|
| Back to top |
|
|
funtanafunflyer
Joined: 04 Nov 2005
Posts: 49
Location: San Francisco, California
|
| Posted: Tue Apr 24, 2007 7:46 pm Post subject: |
|
|
Dear Meyrik, what battery are you using? Are you using 2 batterys or just 1, hence taking advantage of the BEC circuit on the phoenix 25.
Thank you
|
|
| Back to top |
|
|
thedonski
Joined: 13 Dec 2006
Posts: 5
|
| Posted: Sat Apr 28, 2007 1:36 pm Post subject: |
|
|
| deleted
|
|
| Back to top |
|
|
funtanafunflyer
Joined: 04 Nov 2005
Posts: 49
Location: San Francisco, California
|
| Posted: Mon Apr 30, 2007 5:46 pm Post subject: |
|
|
Dear Meyrik, I was looking at the plans for the Diablo 3D and I noticed that the instructions said the I should put a CF rod in front of the hindge line of the horizontal stabilizer. Why did you put your CF rod near the very end of the sabilizer. Why is it also smaller then the one featured in the plan?
Thank you for your reply
|
|
| Back to top |
|
|
| 1 post here was not archived |
Meyrick
Site Admin
Joined: 15 Apr 2004
Posts: 1386
Location: Fremont, CA
|
| Posted: Fri May 04, 2007 9:19 pm Post subject: |
|
|
funtanafunflyer wrote:Dear Meyrik, I was looking at the plans for the Diablo 3D and I noticed that the instructions said the I should put a CF rod in front of the hindge line of the horizontal stabilizer. Why did you put your CF rod near the very end of the sabilizer. Why is it also smaller then the one featured in the plan?
Thank you for your reply
That CF Rod is to make the elevator halves stiff. Without that, the elevators would blow up on a sudden 3D throw.
_________________
--Meyrick-- |
|
| Back to top |
|
|
funtanafunflyer
Joined: 04 Nov 2005
Posts: 50
Location: San Francisco, California
|
| Posted: Sat May 05, 2007 6:56 am Post subject: |
|
|
Meyrick wrote:funtanafunflyer wrote:Dear Meyrik, I was looking at the plans for the Diablo 3D and I noticed that the instructions said the I should put a CF rod in front of the hindge line of the horizontal stabilizer. Why did you put your CF rod near the very end of the sabilizer. Why is it also smaller then the one featured in the plan?
Thank you for your reply
That CF Rod is to make the elevator halves stiff. Without that, the elevators would blow up on a sudden 3D throw.
Thank you, Meyrik!!! |
|
| Back to top |
|
|
Coop
Joined: 02 May 2005
Posts: 27
|
| Posted: Thu Jul 05, 2007 11:35 am Post subject: |
|
|
| What size prop do you use on the Himax? |
|
| Back to top |
|
|
moire
Joined: 10 Jul 2007
Posts: 4
|
| Posted: Wed Jul 11, 2007 4:14 am Post subject: |
|
|
Hi Meyrick,
At first, thank you for sharing so much useful info in this topic! You have done a really good job, I appreciate very much!
I would have a question for you: where did you get that triangle router bit for your dremel? If it is a genuine one do you have a number of it?
I live in Hungary and I cannot find anything like this! Neither among the original parts, nor the cheaper manufacturer's substitutes. I have cut several 45 degrees hinges from depron, and it sucks...
Thanks in advance! |
|
| Back to top |
|
|
3dbatixkid
Site Admin
Joined: 15 Apr 2004
Posts: 1545
Location: Sunnyvale, CA
|
|
| Back to top |
|
|
moire
Joined: 10 Jul 2007
Posts: 4
|
| Posted: Fri Jul 20, 2007 11:44 am Post subject: |
|
|
Well, nevermind, I have finally found one.
It's not like yours, but did the job fine.
Now I'm ready with the parts and decoration (if I can call it like that...) I will post some pics if I'm ready with the body.
guys, how did you get the battery fixed in place? I don't see much space for CG adjustment too, how it is then? Can anyone show me a close-up about the battery in place?
Thanx in advance!
moire wrote:Hi Meyrick,
At first, thank you for sharing so much useful info in this topic! You have done a really good job, I appreciate very much!
I would have a question for you: where did you get that triangle router bit for your dremel? If it is a genuine one do you have a number of it?
I live in Hungary and I cannot find anything like this! Neither among the original parts, nor the cheaper manufacturer's substitutes. I have cut several 45 degrees hinges from depron, and it sucks...
Thanks in advance!
|
|
| Back to top |
|
|
3dbatixkid
Site Admin
Joined: 15 Apr 2004
Posts: 1545
Location: Sunnyvale, CA
|
|
| Back to top |
|
|
moire
Joined: 10 Jul 2007
Posts: 4
|
| Posted: Sun Jul 22, 2007 10:50 pm Post subject: |
|
|
Thank you, I will try it. I have already used velcro on my previous planes, and it worked well. I just wondered that the cut-out under the wing is for the battery, because it seemed too short for any movements and also too narrow to fit mine. So yours is fixed on one side of the vertical fusage, isn't it?
3dbatixkid wrote:You can use masking tape to hold the battery on for a temporary check flight. A long strip of velcro allows for movement of the battery, and also makes it easy to remove.
|
|
| Back to top |
|
|
moire
Joined: 10 Jul 2007
Posts: 4
|
| Posted: Wed Jul 25, 2007 6:55 am Post subject: my first diablo |
|
|
As I promised, here are a few pics of my Diablo.
Created upon this guide only, again a big thanks to Meyrick!
The painting is my very first so it's failed completely, but I don't care, it is good enough for improving visibility from a distance. I can hardly wait for the first flight!
- Attachments
-
- IMG_3599_s.jpg (55.47 KB) Viewed 924 times
-
- IMG_3598_s.jpg (60.15 KB) Viewed 919 times
-
- IMG_3611_s.jpg (62.77 KB) Viewed 917 times
|
|
| Back to top |
|
|
Triscar
Joined: 26 Oct 2005
Posts: 3
Location: Madrid, Spain.
|
| Posted: Wed Aug 08, 2007 9:08 pm Post subject: |
|
|
Hi everyone, great topic :
I have read in page n.4 & n.14 :
Himax 2812-0850;
Meyrick said : "I'm running a GWS 12x6 and I get around a 15~18 minute flight time."
&
3dbatixkid said: "I run the GWS 12x8s and sometimes a 12x6".
If understood it : 12x6 for slower flying , 12x8 for faster flying ? .
But what I am able to buy says: "GWS 12x6 (EP 1260) This shape is constructed for gearbox applications" ( I don´t find it direct drive ).
Do this 12x6 (EP 1260) will work direct in the motor ?. Or shall I still looking for a direct drive 12x6 prop?
Thanks in advance.
(Sorry for my English) |
|
| Back to top |
|
|
Meyrick
Site Admin
Joined: 15 Apr 2004
Posts: 1386
Location: Fremont, CA
|
| Posted: Sat Aug 11, 2007 6:30 am Post subject: |
|
|
Triscar wrote:
Do this 12x6 (EP 1260) will work direct in the motor ?. Or shall I still looking for a direct drive 12x6 prop?
Yes, you use the gearbox type prop. You have to drill the hole larger to fit the direct drive shaft.
_________________
--Meyrick-- |
|
| Back to top |
|
|
Triscar
Joined: 26 Oct 2005
Posts: 3
Location: Madrid, Spain.
|
| Posted: Sat Aug 11, 2007 6:21 pm Post subject: |
|
|
Thank you Meyrick !!! , so I will have to take care not to unbalance the propeller.
Do I follow my common sense or ¿ any advice or trick to make that hole ?.
¿ how do I balance a propeller ?
(Please for dummies)
thanks again. |
|
| Back to top |
|
|
Meyrick
Site Admin
Joined: 15 Apr 2004
Posts: 1386
Location: Fremont, CA
|
| Posted: Mon Aug 13, 2007 7:57 am Post subject: |
|
|
Triscar wrote:Thank you Meyrick !!! , so I will have to take care not to unbalance the propeller.
Do I follow my common sense or ¿ any advice or trick to make that hole ?.
¿ how do I balance a propeller ?
(Please for dummies)
thanks again.
Just drill the hole straight. No need to balance it.
_________________
--Meyrick-- |
|
| Back to top |
|
|
Triscar
Joined: 26 Oct 2005
Posts: 3
Location: Madrid, Spain.
|
| Posted: Mon Aug 13, 2007 3:12 pm Post subject: |
|
|
... thanks a lot!  |
|
| Back to top |
|
|
steven460
Joined: 06 Apr 2008
Posts: 3
|
| Posted: Sun Apr 06, 2008 11:05 am Post subject: Re: Himax 2812-0850 Outrunner & Diablo 3D BUILD thread |
|
|
Hello everybody,
My name is Steven, im from the Netherlands and this is my first post.
Id like to thank the 3D Batix forum to its wealth of information about the Diablo foamy and other models (which i havent tried yet)
I've build the Diablo using the tiled plans and 3mm depron sheets (sandwhiched). Started construction wednesday and flew it today.
1 word: Whow
The diablo flies great, ive got the CG at the leading edge of the battery cut out on the plan, but this doesnt seem to bother the plane at all. It just GOES!
Im using a HiModel 1400rpm/V motor (1oz/30 grams?) and a 11A esc, 1000mAh Viselero battery, and a Master(?) synthersizer RX radio.
Controls are set at about 30 to 50% expo, this makes the plane feel friendly a starter me |
|
| Back to top |
|
|
| |




